
I regularly see posts on social media asking for advi ce and then you get a plethora of answers, some helpful, some not so and some that off putting, it would stop anyone in their tracks at the thought of heading outdoors. The latter is a shame really, as my take on it is that we all started somewhere and the outdoors is something that should be enjoyed (responsibly) by all. Hopefully the following should give people some guidance on what to bring whilst on the hill.
This page is designed to give some basic advice on a number of topics that can often present themselves to “outdoor” folk, it isn’t here as a definitive guide, but a base from which to build upon. Use it as you wish, however remember that if you are ever unsure please seek professional advice.
Before setting off on any new adventure it is worth letting someone know where you plan to go (including your route) and what time you are expecting to be back. Should you not get back on time then your nominated person can let the relevant authorities know. It’s also a good idea to check the weather for the period you’re out walking and the day after should anything serious happen and you spend longer than you wanted to outside. Weather forecast sites can be found in the links section above. With regards to what you should take with you take a look below:
 Rucksack – obviously make sure that it can hold everything that you need to take. But my number one tip would be padding! When I look for a new rucksack I always feel the thickness of the padding around the shoulder and waist straps and I’ve found the thicker the padding, the more comfortable the rucksack tends to be. It is also worth noting that it’s not always one size fits all and that some rucksacks have adjustable back sections so it will fit your height perfectly. If you’re unsure simply ask the store assistant, any decent outdoor store should be able to offer you good advice.
Water – enough for the day, one size doesn’t fit all here. Some people drink more than others, some people drink less. You can go old school and have a water bottle or invest in a water bladder, where you can sip on the go! On long hikes I often take a water filter out with me as a back up.

Food – take a mixture of high calorie and quick release energy foods. The high calorie food will sustain you on your journey, whilst the quick release energy food will give you that little energy boost to make the next leg, before stopping to refuel for lunch. Examples of high calorie include sandwiches, fruit loaf, flapjack etc. Quick release energy examples include jelly babies, wine gums, gummy bears etc.
Map – it goes without saying really. People are more than ever relying on mobile phones and GPS. Don’t get me wrong they have their uses, however they also have their disadvantages, such as signal drop outs and they can lose their charge. It may be worth noting that some phones even have an auto shut off if they get too cold, this has caught a few people out. A map won’t do you wrong in this respect, 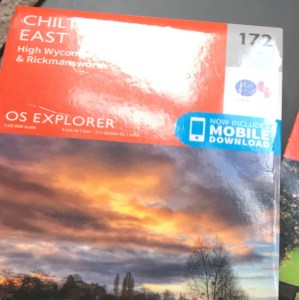 there are a range of suppliers, OS and Harvey are two that I use and they also come in a range of different scales. I have come across people whilst out on the hill who have become lost from picking up visitor centre maps, please air on the side of caution with these as often they aren’t to scale and don’t offer the level of detail that a proper hiking map does. With regards to map reading, there are plenty of people out there who offer navigation skill sessions (myself included) and there are even nationally recognised awards NNAS that can be gained in navigation (again something that I myself offer).
Compass – again a must have. There are a variety of them available, however don’t be afraid to splash some cash on one. I personally use a Silva 4, which I know many other walkers do. However please be wary of the small gift shop compasses you can buy, as they more often than not become demagnetised shortly after purchasing them (in addition to them often not being reliable in the first place). A bit of a problem should you need a bearing whilst on the hill! Problems can also arise when people place their compass near their phone, other electronic devices and even when taking a bearing on their car bonnet, more recently there was even an issue with gloves that had magnets inside of them. All of these could cause your compass to read inaccurately. As with the map, it is worth going on a navigational skill session or NNAS as mentioned above if you need to brush up on your skills.
First Aid Kit – this doesn’t need to be a fully blown paramedic’s kit. Get yourself a starter first aid kit that includes all the basics and then add to it. For me personally I would add paracetemol, ibruprofen, aspirin, glucose gel and a tick remover. The paracetemol and ibruprofen is for pain relief, the aspirin for a suspected heart attack and the glucose gel works well in hypothermic casualties, or if you need an energy boost quick. All of these are over the counter medications, however remember to read the labels of each medication, check for any allergies and get the casualties consent should you need. If you are ever unsure then seek medical help before giving anything. The tick remover is discussed further down the page. It may also be worth getting yourself on a first aid course, there are a number of different ones out there and even ones specifically for the outdoors. Please get in touch if you are looking for course providers as I know of a few that I would highly recommend.
Whistle – really underestimated but a vital piece of kit. A whistle will carry itself a lot better than voice over distances and therefore they are a great way of gaining attention should you need. Sure you could go all out and learn the entire morse code, but you don’t really need to. The international call for help is 3 blasts and a pause. Continue to do this until you get a response (remember to listen out for a response). That being said for most hill going folk, if they hear any whistle then they will often go to investigate to see if someone is in need of help.
Torch – get yourself a torch, even if yo u think “it’ll be alright, I’m only going for a day walk”. Things do change and can delay you on route, in turn meaning you may have to walk in the dark. In addition to lighting the way a torch can also be a great way of signalling for attention, should you need it. The distress signal is identical to the whistling signalling described above. Don’t forget to carry a spare set of batteries too!
Survival Bag – These cheap bags are often underestimated. They generally cost no more than £5 and are made of a thick plastic material. They are usually sold in bright colours so you are easily seen from a distance. They serve multiple uses from climbing into them as you would a sleeping bag to keep warm, to placing them over your head (poking a hole in the top) as a bothy bag, using torn off bits to immobilise limbs and even use them as a makeshift stretcher. An “extension” of a survival bag would be to get a bothy bag, these are more expensive but they can fit more people in, so are good if you are walking in a group and you don’t all want to carry a survival bag. Another option is to get yourself a Blizzard Survival Jacket or Blanket. Personally I have never used one, but I know plenty of people who are really big advocates of them.
Waterproofs – pack a waterproof jacket and waterproof trousers. If you’re wet you get colder a lot quicker as the air around you zaps heat a lot quicker than it would if you were dry. Waterproofs are also good for keeping out the wind. Even if it looks warm and sunny and you think “there’s no chance of it raining”, as you get higher the weather can change quite suddenly. There are loads of different brands out there and it really all depends on how much you’re willing to spend. Generally speaking the more you pay the more “breathable” they’ll be and nicer they will feel (some can feel a bit like wearing a bin bag!). There is also a lot to be said about choosing bright coloured clothing too; trust me when I say that it is a lot easier to search for someone in a colour not often found in nature (blue etc), than a camouflage pattern or black etc.
 Warm Clothing – there’s a lot to be said for the saying “be bold, start off cold”. Generally if you’re slightly chilly to begin with then as you get walking you’ll be at optimum temperature. However don’t be caught unaware as when you stop or a weather front comes in you may need to put another layer on. Decent warm clothing can be a real lift on a groggy hill day, lightweight examples include fleeces and down jackets. It’s advised to keep it all dry with a dry bag or if you don’t fancy splashing out a bin liner or survival bag works just as well!
Notepad and Pencil – why on earth would I need these you ask? Well it helps to get you focused should you need it. Write down coordinates before calling for help, note down any first aid notes or simply to scribble down what you have seen to research it later.
Phone – hopefully pretty obvious, but you never know! If you’re in trouble and require help then ring 999 and ask for the Police and then Mountain Rescue. People will often ask for an ambulance to places which crews will not be able to evacuate from. The ambulance crew on arrival at the scene, then contacts Mountain Rescue, which leaves the casualty on the hill for longer. The process can be streamlined by asking for Mountain Rescue at the very beginning.
Occasionally you may not be able to get a signal, if this is the case you can text 999. A text will go through eventually with the little bits of signal it gets, its worth noting that you should timestamp your text message. In order to use the text messaging service you need to have signed up to it before sending your text, you can sign up here: www.emergencysms.org.uk
 Boots – with so many different boots around it can be difficult to decide what to go for and it all decides on where you are going walking. In lowland areas you can get away with a fairly flexible boot, for upland/mountainous areas you ideally need a rigid boot. The simplest way to test boots is by flexing the boot and compare it to another, the stiffer the boot the better they’ll cope on mountainous terrain and visa versa. Personally I wouldn’t get anything
  other than a boot for walking such as trainers or wellies, as they don’t support the ankle, making sprains more common. Also don’t go for a hike in your new boots without wearing them in first, the best way to do this is literally wear them whenever you can leading up to your hike. Most hiking stores will offer advice on boot fittings, so simply ask!
Countryside Code – in short this is all about treating the countryside with such respect that it is available to everyone for years to come.
A few pointers would be as follows:
- Take your litter with you – this includes banana skins and orange peel, these aren’t naturally occurring in the UK and as such we don’t have the specific bacteria’s needed to break them down fast enough!
- Fires – we all know the image we have in our heads of campfires whilst out in the wilderness. Great if you’re actually at a campsite that allows them. Personally I would never have a fire whilst wild camping, especially so in dry weather. If a fire is directly on the ground it can quite often spread through the ground (especially in areas with peat underfoot, such as open moorland). Additionally as a fire burns embers can be released and land onto the ground, thus potentially starting a fire. Discarded glass bottles (which reflect the sun’s light), disposable BBQ’s and discarded cigarettes have also been to blame for wild fires.
- Gates – leave farm gates as you have found them. Often farmers will open gates to allow livestock to move to another field. As a rule of thumb if I see a gate clearly made just for walkers open then I will close it behind me. If I come across a large gate (big enough to fit a farm vehicle through), then I shall leave it as I find it.
- Land access – don’t just presume that you can wander wherever you wish. Be respectful of the land you are walking from, stick to the paths if it is required. If you are unsure of where and where you cannot access, get yourself onto a basic navigational course.
The government have released various documentation about this, the “quick guide” version can be found here.
 Ticks & Lyme’s Disease – this is something that seems to be on the rise and is often misdiagnosed due to the different symptoms that it can present people with. The pictures are of ticks (2 different species) that I myself got whilst on a trip to the Isle of Rum in September 2017. Often symptoms can mimic those of the flu initially, with a distinctive red ring around the bite site, symptoms can get a lot worse if not treated correctly. So much so that it has led keen walkers unable to walk so much as to the end of their road! It is caused by a bacteria that some ticks carry. The tick bites onto a host and it is often from incorrect removal of the tick that the tick then regurgitates its stomach contents, thus infecting its host. Quite often ticks latch onto warm places such as the inside or armpits, groins and ankles. It’s always worth checking yourself over after every walk, to ensure that any ticks you may have picked up aren’t latched on for a good
  period of time. You can generally tell if they’ve been on a while as the back end of them swells the longer they are on a host. A good example is one I found on my dog in April 2018, you can clearly see a swollen rear, unfortunately they are a little more difficult to detect in dogs due to the thick fur.
 There is a lot of misguidance on how to remove ticks on social media, a classic being putting peppermint oil over the tick, DO NOT do this. It
  looks great as the tick removes itself quickly, however as it is distressed it can regurgitate it’s stomach contents. The safest way is to buy a tick remover and follow the instructions (each type is different). Once removed the tick may still survive, you can send the tick off to Public Health England who are trying to build a picture on how big the tick endemic is, the link to the site is here. Should you require further information on ticks I recommend the Lyme Disease UK, or the Lyme Disease Action website.I hope that this has at least given you a start to getting outdoors. So what are you waiting for, get out there and see some sights!

You must be logged in to post a comment.